Getting Started
Overview
PH Live Sync allows you to easily sync the relevant BIM data to the PHPP and then sync any updates made in the PHPP back to the BIM.
The typical workflow using PH Live Sync is as follows:
- Press the Initial Project Setup button to automatically create the required PHPP Parameters within the BIM to store PHPP data.
- Select the PHPP file to associate with the BIM.
Select elements from the BIM that make up the thermal envelope of the building and tick the ‘PHPP Sync’ parameter. - Sync the BIM with the PHPP.
- Review the results in the PHPP, make adjustments as required, and sync the PHPP data back to the BIM.
- Continue developing your design in either the BIM or PHPP and sync the design changes as you go!
The PH Live Sync Tool Bar

Instructions:
A shortcut to this online help page.
Automatically creates Parameters within the project to store PHPP specific information.
Automatically creates 3D Views & Schedules within the project for easy analysis and modification of the relevant PHPP data.
Automatically loads the Linear Thermal Bridge Family Object into the project ready to use.
Parameters will have the prefix ‘PHPP’ for easy identification and are grouped under ‘Energy Analysis.’
Parameters will be created within ‘Project Information’, as well as for Floors, Walls, Ceilings, Roofs, Doors, Windows, and Room elements.
3D Views and Schedules will have the prefix ‘PH Live Sync’.
Allows you to select the PHPP file that you would like to Sync with.
Once a PHPP file is selected, PH Live Sync will perform an initial sync and any existing data within the Areas, Windows, and Shading worksheets within the PHPP file will be overwritten with the current BIM data.
Some cells within the PHPP that should no longer be updated within PHPP will be colour coded and locked so that they can only be updated by changing the BIM and re-syncing. (Examples: Floor areas, or Window quantities, or a Wall’s Deviation from North.)
The File Name and Path will be stored in the Project Information within the new parameter ‘PHPP File’ for reference.
Open Status Pane:
Opens the Dockable Status Pane.
This pane provides key metrics for the building such as the Treated Floor Area, Heat Loss Form Factor, Heating Demand and Load, and the Cooling Demand.
These metrics are updated when data from the BIM is Pushed to or Pulled from the PHPP.
A view legend is also displayed for the various PH Live Sync 3D Views in the project, such as the Synced Elements 3D View. The legends will be dynamically updated when the views are active.
Pushes the BIM data to the PHPP file.
PH Live Sync will overwrite any existing data in the Areas, Windows, and Shading Worksheets of the PHPP with the current BIM data.
Pulls data from the PHPP file into the BIM.
Any values changed in the Areas, Windows, and Shading worksheets of the PHPP file are updated to the relevant PHPP parameters within the BIM.
Undo Last Push to PHPP:
Undo the last Push to the PHPP file.
The PHPP file will be restored from a backup file that was automatically created before the last Push completed.
Add or Subtract the areas of the faces of other elements to or from the selected building assembly element.
Example: Use this tool to add the surface area of the floor edge to the adjacent wall surface area to capture the total external thermal envelope
Or use this tool to subtract parts of the roof area that overhang the thermal envelope.
You can also modify previous face selections using this tool.
Creates a new 3D View with 3D Faces created for all the surface areas being synced with the PHPP.
This is a 3D representation of the Thermal Envelope of the building.
The 3D Faces will be grouped together for easy selection and deletion once reviewed.
Creates a new 3D View with 3D Faces created for all the surface with an airtight envelope material applied.
This is a 3D representation of the Airtight Envelope of the building.
The 3D Faces will be grouped together for easy selection and deletion once reviewed.
Automatically creates an Area Plan with a Projected Building Footprint.
The footprint will be based on the total extent of all roofs, ceilings, and floors set to sync with the PHPP.
Automatically detects simple Horizon, Overhang, and Lateral elements shading the selected element.
Run a Detailed Shading Analysis to assist in calculating shading reduction factors for complex shading scenes.
Family Objects:
A shortcut to the online library of family objects that have been designed for easy use with PH Live Sync.
Activate License:
Opens the Licensing information for using PH Live Sync.
Initial Setup
You can create a new Revit Project using your own Project Template, using the default Revit Architectural Template, or you can use an existing Revit Project.
You can use either Metric or Imperial units for your project, and units will be automatically converted to Metric or Imperial Units depending on the version of the PHPP you sync with.
First, press the Initial Project Setup button on the PH Live Sync toolbar.
PH Live Sync will then automatically create the required custom parameters within the Revit project. These custom parameters will store data for syncing to the PHPP, such as the element’s ‘Group number’ or the ‘Building element description.’
The custom parameters are grouped under ‘Energy Analysis’ and will have the ‘PHPP’ prefix for easy identification. The relevant custom parameters will be applied to all Floors, Walls, Ceilings, Roofs, Doors, Windows, and Room elements within the Revit Project.
PH Live Sync will then automatically create a 3D view called ‘PH Live Sync – Synced Elements’ within the Revit project. Later, you can use this view to see all the elements that are set to sync with the PHPP and which elements are not.

PH Live Sync will also automatically create other useful 3D views and several schedules within the Revit project that display the same data that appears in the Areas, Window, and Shading worksheets of the PHPP.
The schedules have the prefix ‘PH Live Sync – PHPP Data Schedule’ with a schedule created for the following elements:
- Floors
- Walls
- Ceilings
- Roofs
- Windows
- Curtain Walls
- Doors
- Thermal Bridges
- Rooms
Later, you can use these schedules to more quickly manipulate the various parameters for all the elements in the project.

Next, set the project ‘Location’ in Revit. This will be used by PH Live Sync to determine if the project is within the Northern or Southern Hemisphere and for Shading Analysis. (PH Live Sync will automatically adjust the ‘Deviation from North’ values in the PHPP for you for projects in the Southern Hemisphere if you are using older versions of the PHPP.)

Select PHPP File
Select a PHPP file to sync with by clicking the ‘Select PHPP File’ button. The file will be checked by PH Live Sync to ensure it is a valid PHPP file and a supported version.

PH Live Sync will then perform an initial sync and some cells within the PHPP, that should no longer be updated within the PHPP, will be colour coded and locked so that they can only be updated by changing the BIM and re-syncing. (Examples: Floor areas, or Window quantities, or a Wall’s Deviation from North.)
A new legend item will be added to the ‘Meaning of field formats’ on the ‘Instructions’ worksheet of the PHPP for reference:

The PHPP file path will be saved within ‘Project Information’ for your reference. The PHPP file path or file can be changed at any time if required by clicking the ‘Select PHPP File’ button again.
Selecting Elements to Sync
Elements that form part of the Thermal Envelope of the building should be synced with the PHPP by checking the ‘PHPP Sync’ checkbox parameter.

Elements that are not checked will be ignored by PH Live Sync. As an example, you would not check internal walls as they do not form part of the Thermal Envelope.
You can use the automatically created ‘PH Live Sync – Synced Elements’ 3D view to easily see what elements have and have not been set to sync with the PHPP.

Creating Walls
When creating walls, you are free to create them by drawing in either a clockwise or anti-clockwise direction. You can also duplicate them, mirror them, or otherwise manipulate them as desired.
Please note that you will need to set the ‘Wall Joins’ of the walls that form the Thermal Envelope to ‘Mitered’ so that Revit correctly calculates the entire wall area and does not subtract the thickness of the adjacent connected wall.
If you forget to miter the wall joins, PH Live Sync will warn you and offer to automatically change the wall joins to mitered for you.


Please also note that the wall area Revit displays for walls are always taken from the ‘Exterior Side’ of the wall and are net areas, with the areas of any cut outs for doors or windows subtracted.
Because the PHPP requires gross wall areas, PH Live Sync will calculate the gross wall area for you by adding the areas of any doors or windows to the net wall area calculated by Revit.
The bottom of the wall should extend down through the thickness of the Floor that forms the bottom of the Thermal Envelope, and the top of the wall should also extend through the thickness of the Ceiling or Roof element that forms the top of the Thermal Envelope so that the surfaces that determine the areas meet with each other.

![]() Alternatively, you can use the ‘Add or Subtract Face Areas’ tool to include the areas of the adjacent Roofs, Ceilings & Floors to the Wall.
Alternatively, you can use the ‘Add or Subtract Face Areas’ tool to include the areas of the adjacent Roofs, Ceilings & Floors to the Wall.
Once the walls are created, the appropriate values for the PHPP parameters can be entered, these include:
- Building assembly description. (If left blank, a default name will be created based on the Wall’s ID number in Revit.)
- Group number. (If left blank, the default value of ‘8’ will be applied for an ‘Exterior Wall – Ambient’.)
- EnerPHit exemption for U-value.
- Reduction factor shading.
- Exterior absorptivity.
- Exterior emissivity.
Once the walls have been synced to the PHPP, these values can be changed in the PHPP to update the parameter values in the Revit Model by clicking the ‘Pull Data from PHPP’ button. Generally, it is more efficient to enter values directly in the PHPP after the Revit Model has first been synced with the PHPP, as multiple values can be entered and copied from cell to cell more quickly in the PHPP.
The following parameters are locked in Revit and can only be updated within the PHPP as they require specific values to be chosen:
- Selection building assembly / Building system.
- Selection building element.
The following values will be calculated by PH Live Sync and entered into the PHPP automatically:
- Quantity.* (This will always be 1 as each element is entered individually by PH Live Sync in the PHPP.)
- Area.*
- Angle of Inclination from the Horizontal.*
Deviation from North.*
* These cells in the PHPP will be locked by PH Live Sync so that they can’t be changed, as they should only be updated in the Revit Model and then updated in PHPP by clicking the ‘Push Data to PHPP’ button.

Creating Floors
Floors that form part of the Thermal Envelope should be drawn so that their perimeter extends to the exterior lines of the walls so that the surfaces that determine the areas meet with each other.

Once the floors are created, the appropriate values for the PHPP parameters can be entered, similar to walls.
If the ‘Building assembly description’ is left blank, a default name will be created based on the Floor’s ID number.
If the’ Group number’ is left blank, the default value of ‘11’ will be applied for a ‘Floor Slab’.
Creating Ceilings
Ceilings that form part of the Thermal Envelope should be drawn so that their perimeter extends to the exterior lines of the walls so that the surfaces that determine the areas meet with each other.

Once the ceilings are created, the appropriate values for the PHPP parameters can be entered, similar to walls.
If the ‘Building assembly description’ is left blank, a default name will be created based on the Ceiling’s ID number.
If the ‘Group number’ is left blank, the default value of ‘10’ will be applied for a ‘Roof/Ceiling – Ambient’.
Creating Roofs
Roofs that form part of the Thermal Envelope should be drawn so that their perimeter extends to the exterior lines of the walls so that the surfaces that determine the areas meet with each other.

Eaves or other similar roof overhangs that are not part of the Thermal Envelope need to be created as a separate roof elements so that their areas are kept distinct from other roofs elements that are part of the Thermal Envelope.

![]() Alternatively, you can use the ‘Add or Subtract Face Areas’ tool to include the areas of the adjacent Roofs, Ceilings & Floors to the Wall.
Alternatively, you can use the ‘Add or Subtract Face Areas’ tool to include the areas of the adjacent Roofs, Ceilings & Floors to the Wall.
The roof element and its area will be synced to the PHPP as one entry for roofs types that pitch from one side only (i.e. skillion roofs) and the orientation to north will be calculated accordingly.

For roofs that pitch from more than one side (i.e. hipped roofs or gable roofs) the roof’s areas and orientation to north will be calculated separately for each roof surface and will be entered into the PHPP as ‘Roof 1 – Surface 1, Roof 1 – Surface 2’ etc.


Please also note that the areas Revit displays for roofs are always net areas, with the areas of any cut outs for roof windows/skylights subtracted. The PHPP requires gross roof areas, so PH Live Sync will calculate the gross roof area for you by adding the areas of any roof windows/skylights to the net roof area calculated by Revit.
Once the roofs are created, the appropriate values for the PHPP parameters can be entered, similar to walls.
If the ‘Building assembly description’ is left blank, a default name will be created based on the Roof’s ID number. If the ‘Group number’ is left blank, the default value of ‘10’ will be applied for a ‘Roof/Ceiling – Ambient’.
The roof surfaces ‘Angle of Inclination from the Horizontal’ will be calculated based on the pitch of the roof.
Add or Subtract Face Areas
Add or Subtract the areas of the faces of other elements to or from the selected building assembly element.
Example 1: Add the surface area of the floor edge and roof edge to the adjacent wall surface area to capture the total external Thermal Envelope:
Step 1: Open the default 3D View (or any other 3D View that doesn’t have view filters applied that override colours in the view) and click the ‘Add or Subtract Face Areas’ Button:
Select “Add” to add additional face areas to the Wall:

Step 2: Select the Building Assembly (the Wall in this example) to modify:


Step 3: Select the faces of the adjacent Floor edge & Roof edge to add their areas to the Wall’s ‘Gross Area’:


Press the Esc key when you have finished selecting all the faces you want to add.

Your selection will be saved, and the ‘PHPP Gross Area’ parameter calculation for the Wall will be updated. The total area of any faces added or subtracted will also be calculated and displayed in the relevant PHPP parameter:

Any added areas will appear in the PHPP in the rows below the associated building element as additional surfaces:

Example 2: Subtract parts of the roof area that overhang the Thermal Envelope:
Step 1: Open the default 3D View (or any other 3D View that doesn’t have view filters applied that override colours in the view) and click the ‘Add or Subtract Face Areas’ Button:
Select “Subtract” to subtract areas of the Roof:
Step 2: Select the Building Assembly (the Roof in this example) to modify:

Step 3: Select the surfaces of the Roof that overhang the external Wall (Thermal Envelope) below to subtract these areas from the Roof’s ‘Gross Area’:

You can use the ‘Split Face’ tool in the Modify tab to create these smaller roof surfaces on the main Roof as shown in this example.
Tip: Use locking constraints to permanently align the split face line with the wall face below, in case future design changes are made to the wall that affect the location of this line.
Press the Esc key when you have finished selecting all the faces you want to add.
Your selection will be saved, and the ‘PHPP Gross Area’ parameter calculation for the Roof will be updated. The total area of any faces added or subtracted will also be calculated and displayed in the relevant PHPP parameter:

The Roof’s ‘Gross Area’ will be used as the area value in the PHPP with the areas of the subtracted faces excluded automatically.
You can also modify previous face selections using this tool.
- If you would like to deselect a previously ‘added’ face area, then use the ‘Add’ button again and deselect the ‘added’ face from the building assembly element.
- If you would like to deselect a previously ‘subtracted’ face area, then use the ‘Subtract’ button again and deselect the ‘subtracted’ face from the building assembly element.
Use the automatically created ‘Building Elements With Other Face Areas Associated’ 3D view to easily keep track of what building assembly elements in the BIM have other face areas associated with them:

Windows and Doors
Any window or door family object can be used with PH Live Sync and the required PHPP parameters will be created for them when you click the ‘Initial Project Setup’ button.
If you use family objects that have ‘Instance’ parameters for the width and height, you will have the ability to change the width and height values within the PHPP and see the family object will flex accordingly in Revit when synced. (Family objects with their width and height assigned by ‘Type’ parameters are not able to be flexed.)

For PHPP 9 users, separate window objects should be used and placed abutting each other when multi-pane windows are proposed so that the installation factor values can be correctly entered: “1” if the corresponding jamb has direct contact with the building envelope, and “0” if two windows are abutted symmetrically against each other. (See Page 105, 17.4 of the PHPP 9 Handbook.)

For PHPP 10 users, multi-pane windows can be used, with the length values of fixed frames, mullions and transoms either manually entered or automatically calculated by the Window Family Object. (See Page 214, 19.3.4 of the PHPP 10 Handbook.)


Doors will be entered into the ‘Windows’ worksheet in the PHPP unless you have assigned a value to the ‘PHPP U-Value’ parameter, in which case they will be entered into the ‘Areas’ worksheet as an ‘Exterior Door.’
Where multiple doors are assigned a value to the ‘PHPP U-Value’ parameter, their areas will be combined as one total value in the PHPP and the average U-Value will be used* if they differ from door to door.
(*This is not best practice and should be avoided.)
The area/s of the door/s will be automatically subtracted from the wall/s they are hosted in by PH Live Sync and you will not need to use the ‘User subtraction’ column in the PHPP to manually subtract the area.
Once the windows and doors are created, the appropriate values for the PHPP parameters can be entered, these include:
- Description. (If left blank, a default name will be created based on the Window’s/Door’s ID number in Revit.)
- Installation situation. (Left, Right, Bottom, and Top.)
- Comfort exemption.
- Height of shading object.#
- Horizontal distance.#
- Window reveal depth.#
- Distance glazing to reveal.#
- Overhang depth.#
- Distance glazing to overhang.#
- Additional reduction factor winter shading.
- Additional reduction factor summer shading.
- Reduction factor z for temporary sun protection.
- U-Value* (This parameter is assigned to door objects only. Leave blank for glazed doors or for certified doors where more detailed property information is available.)
Additional parameters for PHPP 10 users include:
- Window Position Number.
Threshold Length. ^ - Fixed Glazing Length of Outer Frame. (Left, Right, Bottom, and Top.)^
- Mullion Lengths. (m, m1, m2 and fm Types)^
- Transom Lengths. (t, t1 and t2 Types)^
Once the window have been synced to the PHPP, these values can be changed in the PHPP to update the parameter values in the Revit Model by clicking the ‘Pull Data from PHPP’ button. Generally, it is more efficient to enter values directly in the PHPP after the Revit Model has first been synced with the PHPP, as multiple values can be entered and copied from cell to cell more quickly in the PHPP.
# These values can be easily and accurately changed by moving the reference planes built-in to the PHLS Window Family Object or by using the ‘Simple Shading Object Detection Tool.’
^ These values are automatically calculated by the PHLS Window Family Object or can be made into calculated parameters in your own family objects.
The following parameters are locked in Revit and can only be updated within the PHPP as they require specific values to be chosen:
- Glazing.
- Frame.
The following values will be calculated by PH Live Sync and entered into the PHPP automatically:
- Quantity.* (This will always be 1 as each element is entered individually by PH Live Sync in the PHPP.)
- Width and Height. (Can be changed in the PHPP for Family Objects with Instance Parameters for Width and Height to flex the object in the Revit Model.)
- Installed in.*
* These cells in the PHPP will be locked by PH Live Sync so that they can’t be changed, as they should only be updated in the BIM and then updated in PHPP by clicking the ‘Push Data to PHPP’ button
Roof Windows/Skylights
Any roof window/skylight family object can be used, though you must have the ‘Category’ of the family set to ‘Window.’ (Some roof window/skylight family objects are created as ‘Generic Model – Roof Based’ or similar, and therefore won’t have the required PHPP parameters applied to them and will be ignored by PH Live Sync if they are not categorised as windows.)
Roof windows/skylights that have ‘Instance’ parameters for the height and width will give you the ability to change the width and height values within the PHPP and the object will flex accordingly in Revit when synced. (Family objects with their width and height assigned by ‘Type’ parameters are not able to be flexed.)
Once the roof windows/skylights are created, the appropriate values for the PHPP parameters can be entered, similar to windows and doors.
If the ‘Description’ is left blank, a default name will be created based on the roof window’s/skylight’s ID number.
Curtain Wall Windows
Curtain walls can be used to model windows in the BIM, provided they are embedded in a host wall.
Both rectangular and triangular curtain wall windows are supported. (Note that complex irregular shapes will need to be broken into separate smaller rectangular or triangular windows.)
PH Live Sync will create a default curtain wall window type in the BIM called ‘PHLS Curtain Wall Window’ when you click the ‘Initial Project Setup’ button.
This curtain wall window will have specifically named mullions applied for the outer frame of the window, and for the vertical and horizontal mullions/transoms, that match the naming conventions of the PHPP.

For PHPP 9 users, separate curtain wall windows should be used and placed abutting each other when multi-pane windows are proposed so that the installation factor values can be correctly entered: “1” if the corresponding jamb has direct contact with the building envelope, and “0” if two windows are abutted symmetrically against each other. (See Page 105, 17.4 of the PHPP 9 Handbook.)
For PHPP 10 users, multi-pane curtain wall windows can be created, and the length values of the various outer frames, mullions, and transom types that make up the window are all automatically calculated. (See Page 214, 19.3.4 of the PHPP 10 Handbook.)

The mullions that make up the curtain wall window are automatically entered into the appropriate locations within the ‘Windows’ worksheet of the PHPP based on their names:
- Vertical mullions that have “fm” or “m2” or “m1” in their description are allocated to the “Mullion Length” values in the PHPP. (If the mullions don’t contain a valid mullion type description, they are assumed to be the default type “m”.)
- Horizontal mullions (otherwise know as Transoms in the PHPP) that have “t2” or “t1” in their description are allocated to the “Transom Length” values in the PHPP. (If the mullions don’t contain a valid transom type description, they are assumed to be the default type “t”.)
- Horizontal mullions at the bottom of the curtain wall window that have “Threshold” in their description, are allocated to the “Threshold” value in the PHPP. (If thresholds are incorrectly used in other locations, the will be automatically entered into the PHPP as the appropriate default type for the relevant location they are used in.)
- Mullions around the perimeter of the curtain wall window that have “Opening” in their description, are automatically subtracted from the relevant “Fixed Glazing Length of Outer Frame” values in the PHPP. (If the mullions don’t contain “Opening” in the description, they are assumed to be the default type “Fixed”.)

Note that Revit categorises both Curtain Walls and Basic Walls as ‘Walls’ therefore the PHPP specific parameters that PH Live Sync automatically creates that are relevant to Walls, will also be shown in the properties of Curtain Walls and can be ignored. (For example ‘PHPP Building assembly description’)
The PHPP parameters relevant to ‘Windows’ that are applicable Curtain Wall Windows will have the prefix ‘PHPP | CW |’ to distinguish them from the ‘Wall’ parameters that are not applicable in this context.

Thermal Bridges
Use the Linear Thermal Bridge family object created specifically for PH Live Sync to trace the Linear Thermal Bridges in the Revit Model and then select their type, either ‘Ambient’ ‘Perimeter’ or ‘Floor Slab.’


Once the thermal bridges are created, the appropriate values for the PHPP parameters can be entered, these include:
- Thermal bridge – denomination. (If left blank, a default name will be created based on the Thermal Bridges ID number in Revit.)
- Psi.
- fRsi.
Once the Thermal Bridges have been synced to the PHPP, these values can be changed in the PHPP to update the parameter values in the Revit Model by clicking the ‘Pull Data from PHPP’ button. Generally, it is more efficient to enter values directly in the PHPP after the Revit Model has first been synced with the PHPP, as multiple values can be entered and copied from cell to cell more quickly in the PHPP
The following parameters are locked in Revit and can only be updated within the PHPP as they require specific values to be chosen:
- Selection building system.
- Detail selection.
The following values will be calculated by PH Live Sync and entered into the PHPP automatically:
- Group Number. (Based on the Family Type selected. Can be changed in the PHPP to update the Revit Model.)
- Quantity.* (This will always be 1 as each element is entered individually.)
Length.*
* These cells in the PHPP will be locked by PH Live Sync so that they can’t be changed, as they should only be updated in the Revit Model and then updated in PHPP by clicking the ‘Push Data to PHPP’ button.

Projected Building Footprint
![]() A Projected Building Footprint can be automatically created using the “Create Projected Building Footprint” tool.
A Projected Building Footprint can be automatically created using the “Create Projected Building Footprint” tool.
PH Live Sync will then create a new Area Plan called “Projected Building Footprint” in the project, and will use the footprint of all roofs, ceilings, and floors in the BIM that are set to sync with the PHPP to create area boundaries. The areas created will be automatically named: “Projected Building Footprint”

Alternatively, you can use an existing Area Plan or create a new one and draw the area boundary of the Projected Building Footprint manually. (See the PHPP Handbook for guidance on determining the Projected Building Footprint extent.)
The Projected Building Footprint is re-calculated by PH Live Sync every time you sync with the PHPP by searching all Area Plans within the BIM for any areas called: “Projected Building Footprint” (This is not case sensitive.)
If there are multiple areas called “Projected Building Footprint” in the BIM, PH Live Sync will sum the areas to create a single total area entry for the PHPP.
Treated Floor Area
For standard versions of the PHPP:
The overall Treated Floor Area is calculated automatically by PH Live Sync by searching the BIM for any rooms that have their ‘PHPP TFA %’ parameter value greater than 0.

Simply set the TFA % for each of the rooms within the Thermal Envelope. Most room will need to be set to 100 (i.e.. 100% of the room area taken into account) while others can be set to the required percentages based on the room use. (See the PHPP Handbook for guidance on room uses and the TFA percentages applicable.)
Any rooms outside of the Thermal Envelope should be left as ‘0’ and will then be ignored by PH Live Sync.
For easyPH versions of the PHPP:
The overall Treated Floor Area is calculated by easyPH by adding all the areas of each individual room together.
Rooms within the Thermal Envelope should be synced with easyPH by checking the ‘PHPP Sync’ checkbox parameter.

Once the Room is set to sync with easyPH, the appropriate values for the Room’s PHPP parameters can be entered, these include:
- Clear Height Factor. (If left blank, a default value of 100% will be used.)
- Design Maximum Extract Air.
- Design Maximum Supply Air.
- TFA Comments.
- Vn50 Comments.
- Vn50 Factor. (If left blank, a default value of 100% will be used.)
The TFA Category parameter is locked in Revit and can only be updated within easyPH by selecting the appropriate category from the list of specific values.
(The TFA% value can be left blank or set appropriately, however this parameter is only used when calculating the overall TFA for standard versions of the PHPP as outlined above and is not relevant when using easyPH.)
The following values will be calculated by PH Live Sync and entered into easyPH automatically:
- Floor/Level.* (Based on the level that the room is constrained to in Revit.)
- Amount.* (This will always be 1 as each element is entered individually.)
- Net Floor Area.*
- Room Height.* (Based on the ‘Unbounded Height’ of the room in Revit.)
* These cells in easyPH will be locked by PH Live Sync so that they can’t be changed, as they should only be updated in the Revit Model and then updated in easyPH by clicking the ‘Push Data to PHPP’ button.
Syncing the Revit Project with the PHPP File
Click on the ‘Push Data to PHPP’ button to sync data from the BIM to the PHPP.
Once you have pushed your BIM data to the PHPP, you can then manipulate it in the PHPP as desired.
Click on the ‘Pull Data from PHPP’ button to sync data from the PHPP back to the BIM.
You can keep repeating the process of updating the BIM or the PHPP and keeping them synced as you make changes to either one.
Please note that PH Live Sync will automatically save the PHPP Excel File every time you sync.
A backup PHPP file will be created in the same location as the original PHPP file when you ‘Push Data to PHPP’ in case you need to restore it. You can press the ‘Undo Last Push to PHPP’ button to automatically restore the backup PHPP file.
Design Options & Phasing
Any Design Option or Phase that is active in the “PH Live Sync – Synced Elements” 3D view will be adopted when filtering elements to sync with the PHPP.
For example, an existing wall that is set to sync with the PHPP, but that is not part of the current ‘New Construction’ Phase, will not be synced with the PHPP.
Or for example, a proposed window in Design Option 1 that is set to sync with the PHPP, but that is not part Design Option 2 that is currently active in the view, will not be synced with the PHPP.


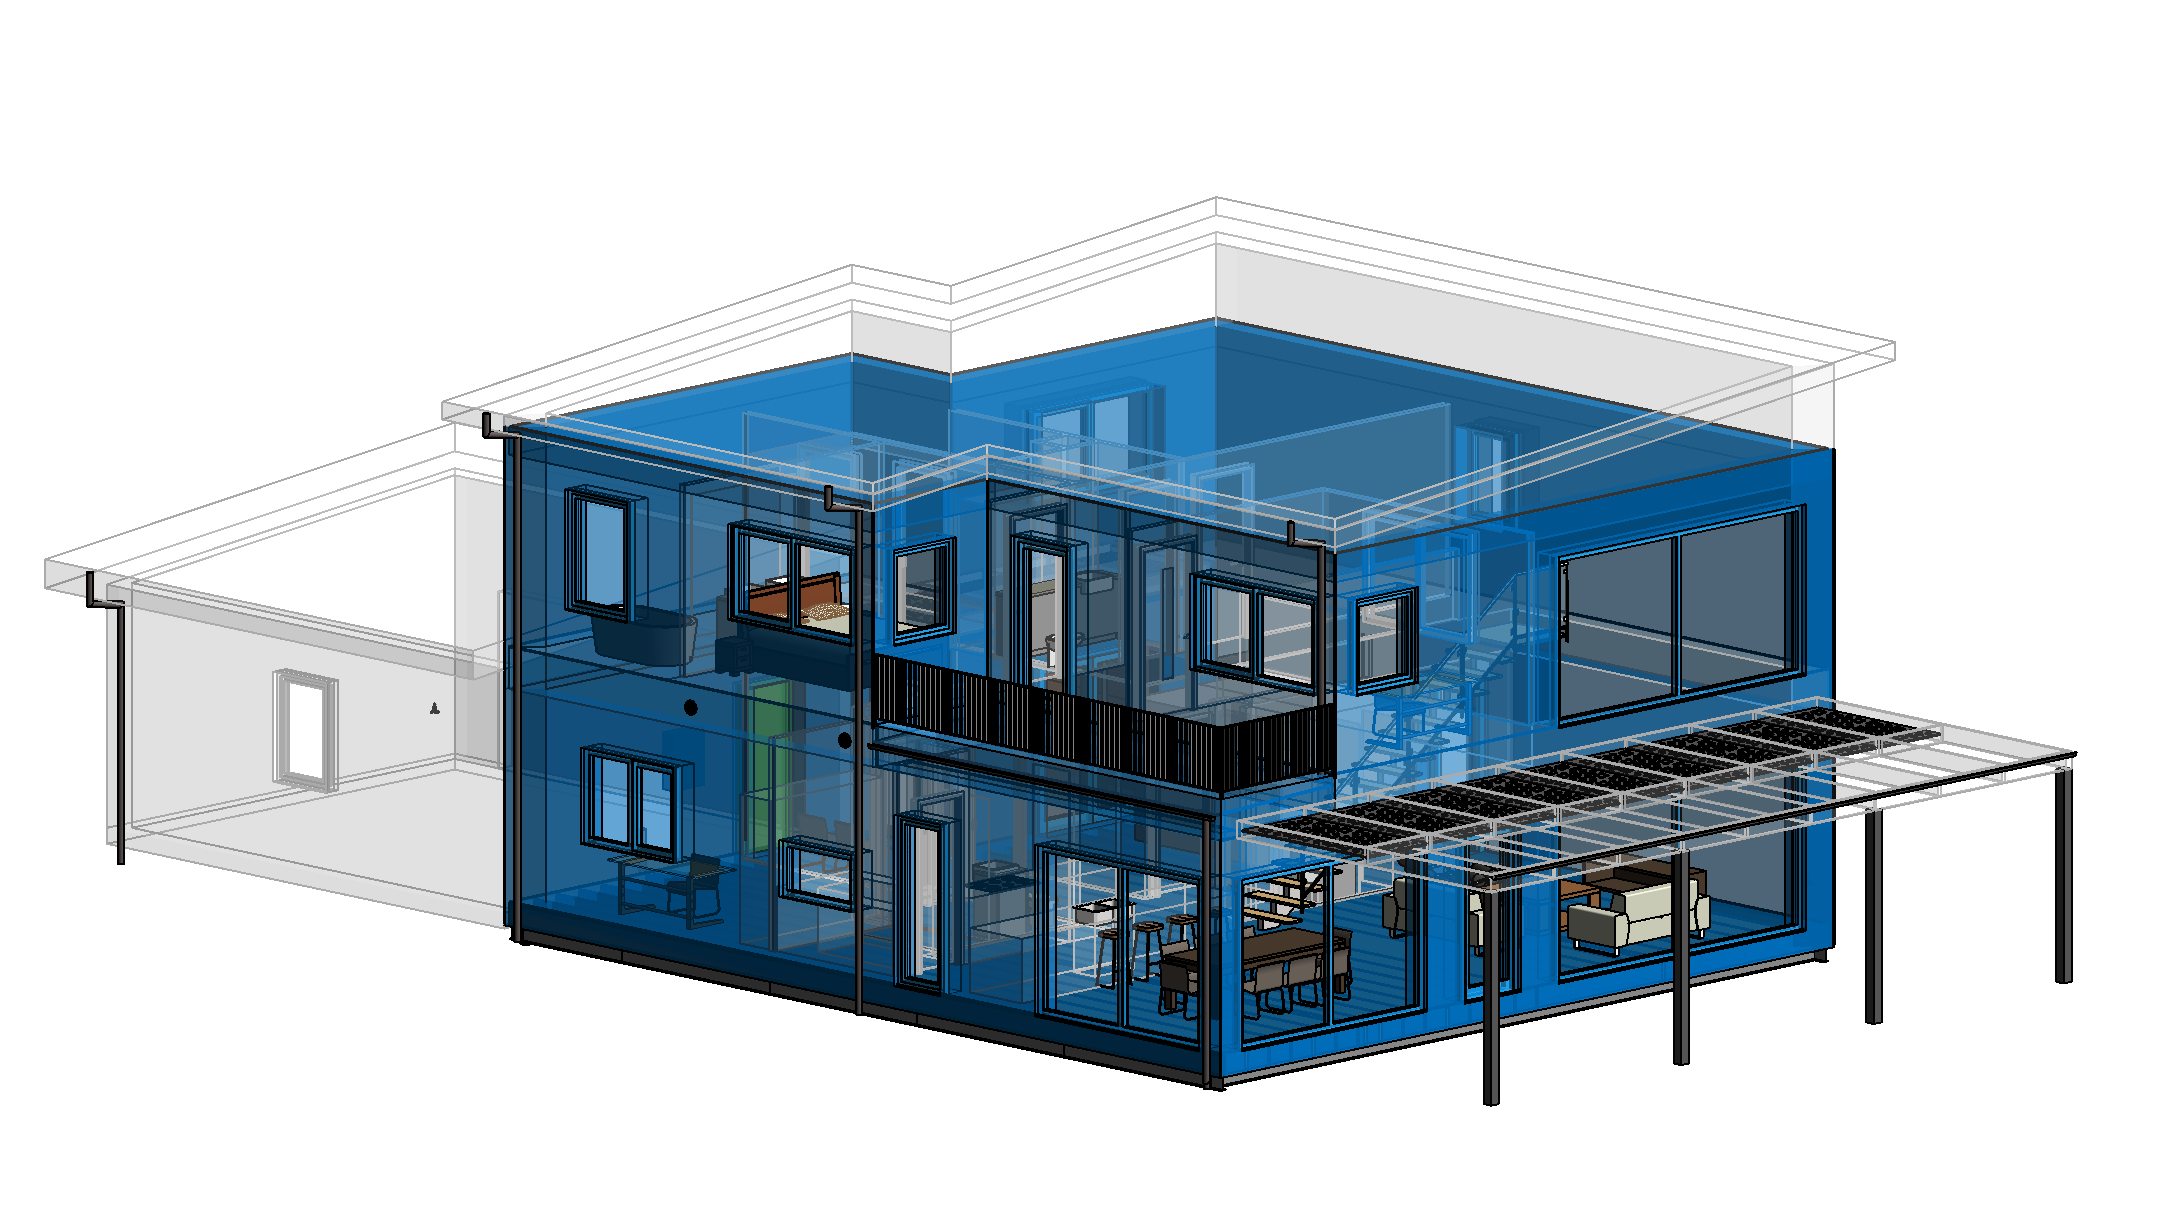
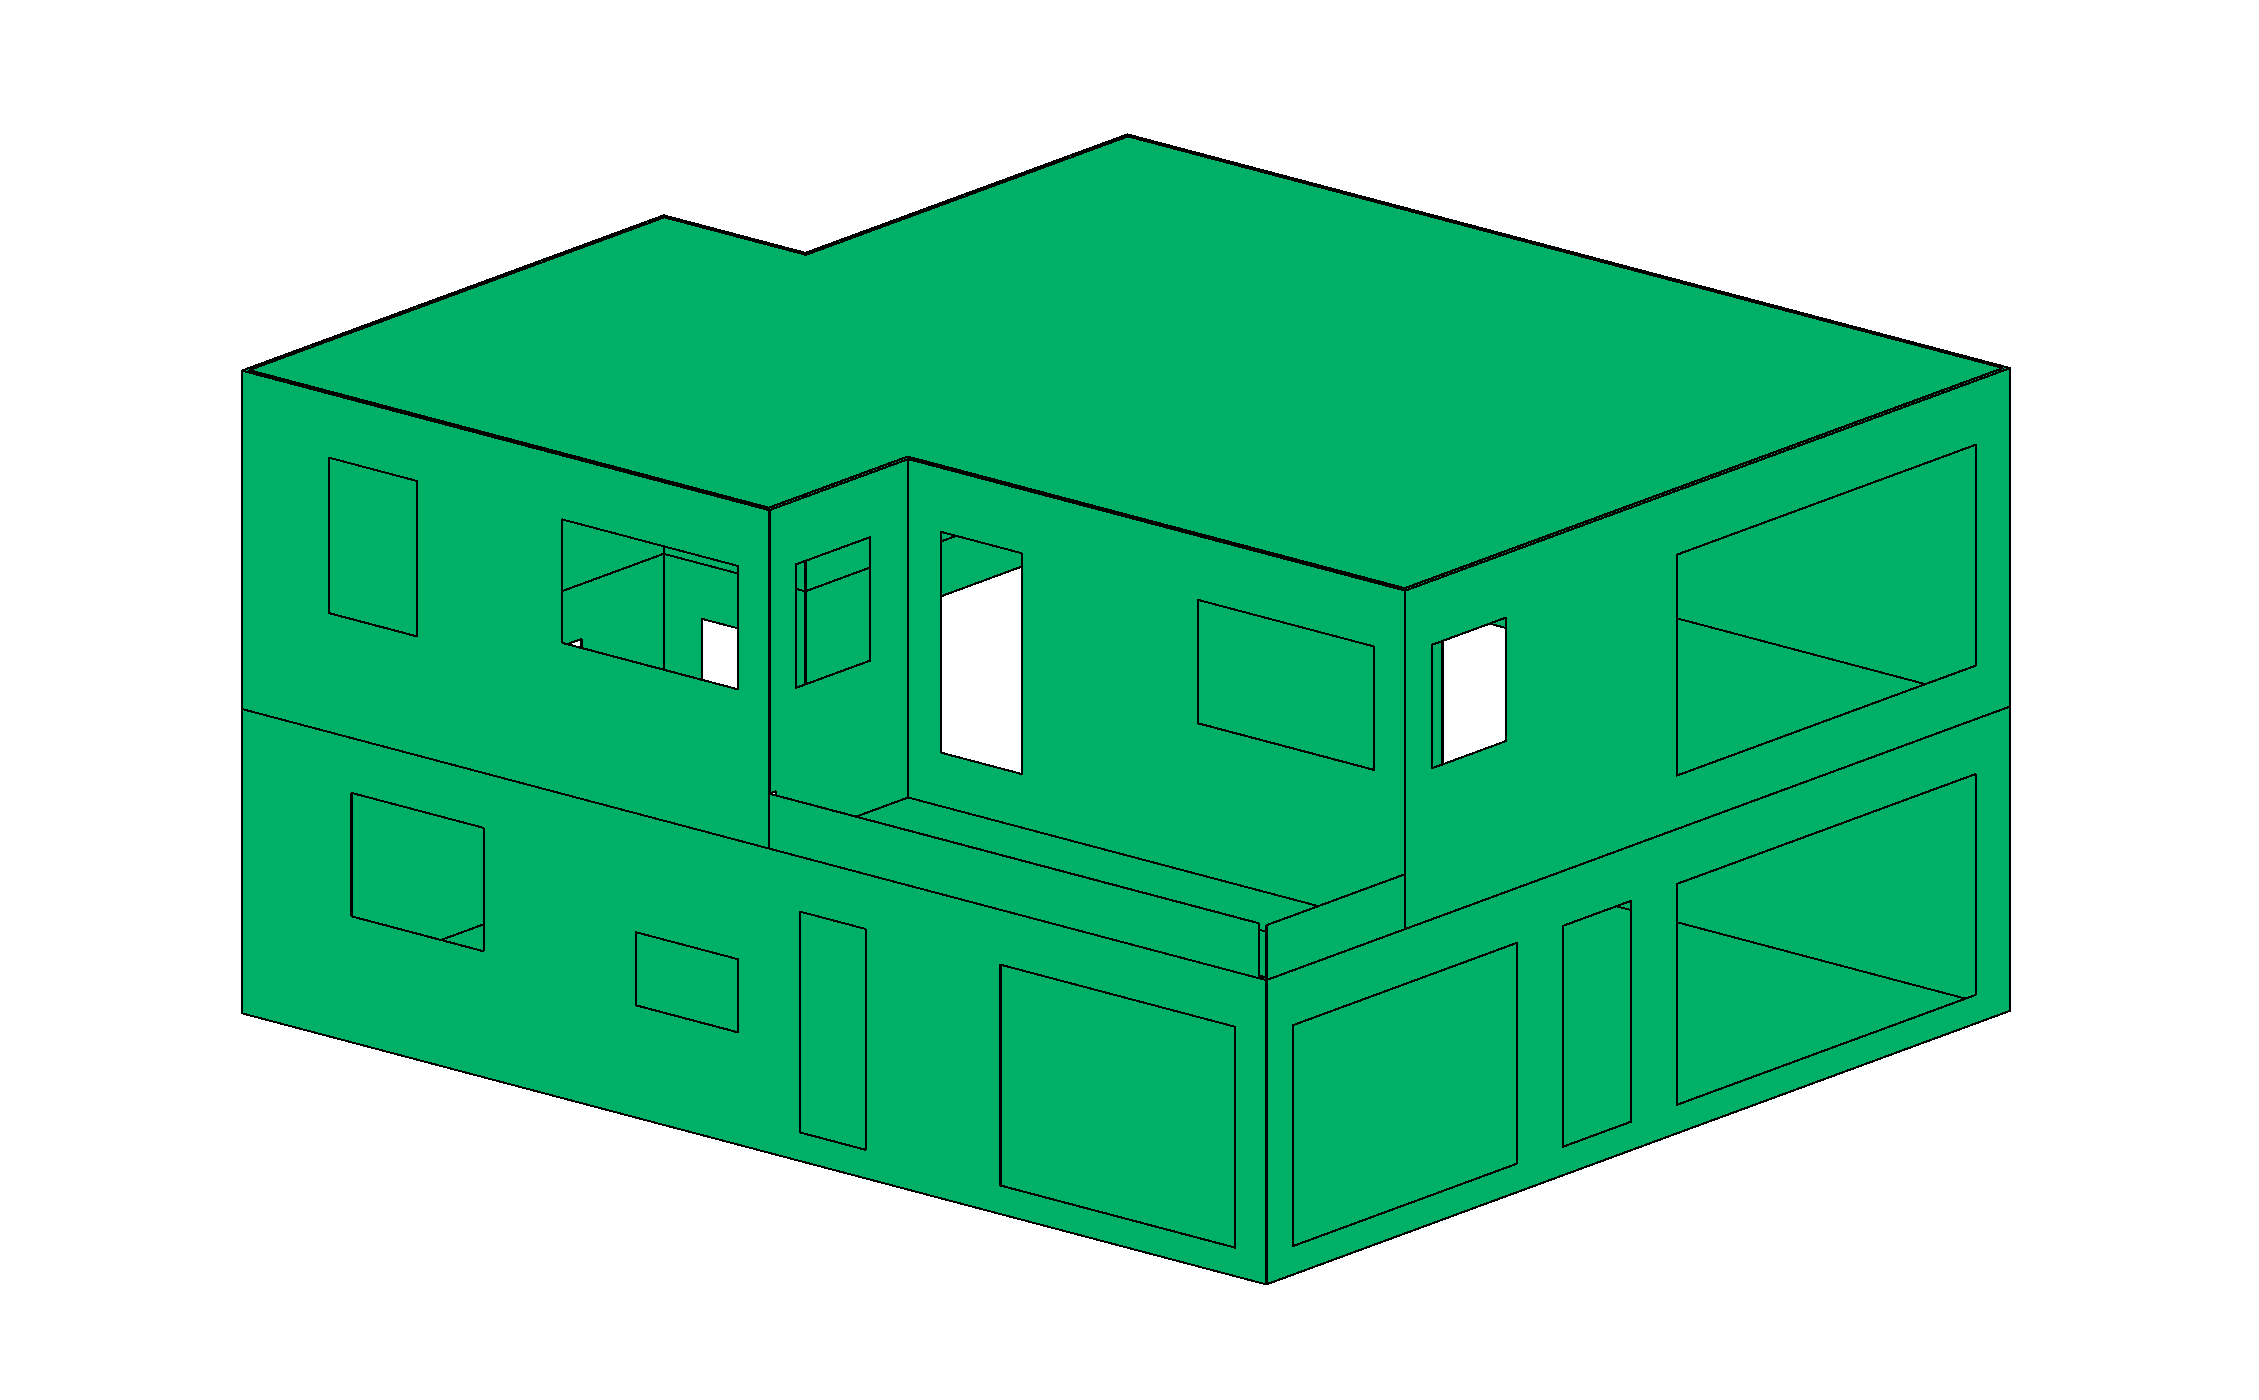
Thermal Envelope Visualisation
Use this tool to quickly generate a group of 3D Faces for all the surface areas being synced with the PHPP.
This is a 3D representation of the Thermal Envelope of the building, and this tool can be used to check that the entire envelope has been selected correctly.
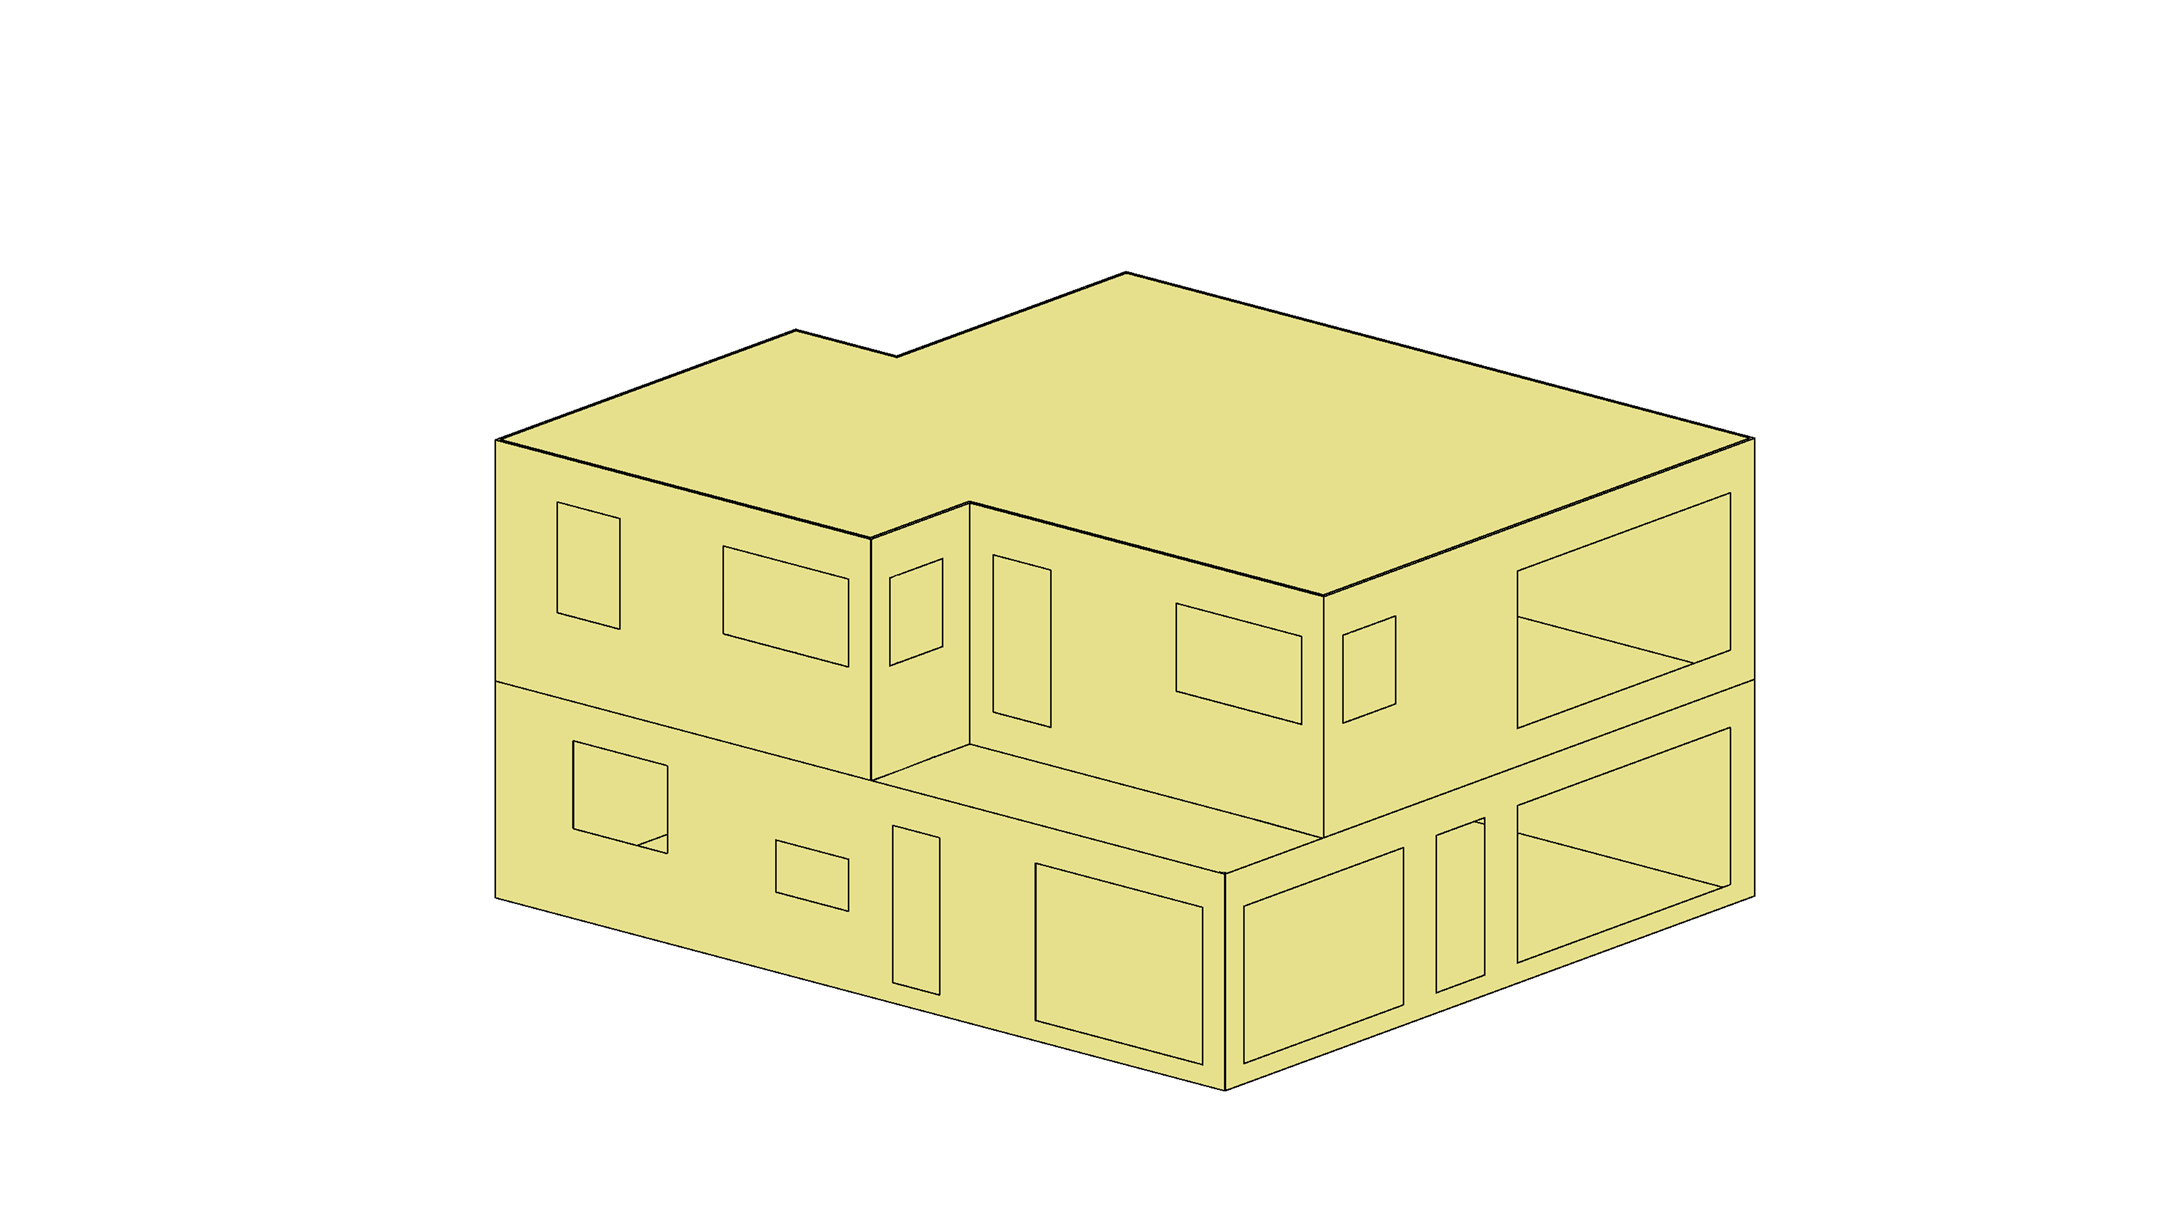
Air-tight Envelope Visualisation
Use this tool to quickly generate a group of 3D Faces for all the surfaces in the BIM with an airtight envelope material applied.
PH Live Sync will search for a material name containing either “air-tight” or “airtight” (not case sensitive) either within the element build-up or as a paint applied material on the surfaces of the element.

This is a 3D representation of the Air-tight Envelope of the building, and this tool can be used to check that the entire envelope is designed to be air-tight.
Simple Shading Object Detection
(Available in Revit 2025 & 2026 Only)
Automatically detect simple Horizon, Overhang, and Lateral Reveal elements shading the selected element. The selected element can be a window, a glazed door, curtain wall glazing, a skylight, or even a PV solar collector panel.
Open a 3D View that you want to use for the automatic detection process and select the element you want to analyse.

Note: All elements visible in the 3D view can be detected , so make sure to modify the visibility of elements in the 3D view appropriately.
Step 1: Select any Revit Categories you would like to ignore from the detection process or enter the names of elements or family objects to ignore as desired:

Then press the “Start Simple Shading Object Detection” button to start the detection process.
Step 2: Use the tabs to navigate and review the results for each of the Horizon, Overhang, and Lateral Reveal shading objects automatically detected:

Press the “Save Shading Results” buttons for each of the Horizon, Overhang, and Lateral shading objects detected to save the results for each object to the relevant PHPP parameters for the selected element.
The parameters that the results are saved to are:
- PHPP Height of shading object
- PHPP Horizontal distance
- PHPP Overhang depth
- PHPP Distance glazing to overhang
- PHPP Window reveal depth
- PHPP Distance glazing to reveal
Optionally, for a visual representation of the results, press the “Draw Model Lines” button to draw model lines from the analysis point of the selected element to the detected shading object.
These model lines can be deleted using the “Delete Model Lines” button that will appear after a model line is created.

Please Confirm the Results:
The shading object detection results may not be correct for every possible shading scenario and should be confirmed and adjusted if required
Detailed Shading Analysis
(Available in Revit 2025 & 2026 Only)
Run a Detailed Shading Analysis to determine how much shading occurs on the glass of a selected element. The selected element can be a window, a glazed door, curtain wall glazing, a skylight, or even a PV solar collector panel.
The shading analysis window is separated into three tabs with distinct processes in each:
Diffuse Shading Analysis: An analysis of the shading of the overall view, which will reduce diffuse insolation on the glass surface/s of the element.
Direct Beam Shading Analysis: An analysis of the shading of the glass surface/s for given datetimes, which will reduce direct beam insolation on the glass surface/s at that datetime.
Reduction Factor Calculator: A calculation of the diffuse, direct beam, and ground reflectance components of the insolation on the selected element and the calculation of a reduction factor based on the effects that both the diffuse and direct beam shading analysis results will have on the diffuse and direct beam components of the insolation.
Open a 3D View that you want to use for the analysis and select the element you want to analyse.
Note: All elements visible in the 3D view can be detected during the analysis process, so make sure to modify the visibility of elements in the 3D view appropriately to ensure a true representation of the real world conditions you would like to analyse.
Diffuse Shading Analysis:
Step 1: Adjust the Diffuse Shading Analysis settings as required:

- Resolution: Select an appropriate level for the analysis, balancing performance with the level of detail required for accuracy. (Views with more complex objects in them, like trees, shading louvers, or balustrades will require a higher level of resolution to be detected accurately.)
- Default Sky Colour: The default sky colour used for the shading mask image will be white, however you can select an alternative colour for more contrast between the sky area and lighter coloured objects in the view if desired.
- Generate Model Lines: (Optional) Selecting this option will create 3D Model Lines that represent the detection rays that where emitted from the analysis point to detect obstructions in the view. (This is useful for visualising the ray paths and results, but can take a while for Revit to complete. Using Low-Resolution is recommended to improve performance and to limit the amount of 3D Model Lines created.)
Step 2: Start the Diffuse Shading Analysis when ready…

…and save the results. These will be saved within the selected element’s ‘PHPP Diffuse Shading’ parameter:

Step 3: Review the results and save the Diffuse Shading Mask Image or Results Log if desired.
The Diffuse Shading Mask represents the view looking outwards. The field of view is 90° on the vertical plane and 180° on the horizontal plane from the glass bottom centre point.

How it works:
Intersection rays are cast from the bottom centre point of the glass surface/s (with the bottom centre point automatically adjusted for family objects where the glass is modelled to be recessed into the surrounding frame) outwards in a quarter hemisphere pattern, with the number of rays cast determined by the chosen resolution.
If a ray intersects another element, that ray is counted as a ‘hit’ and the colour of the material of the object that is hit is recorded for use in producing the shading mask image. Rays that don’t intersect an object are counted as a ‘miss’ and are allocated the sky colour. (White by default.)
The total number rays cast is then compared to the number of hits and misses to determine the overall shading percentage of the view. A detailed log file is generated that outlines which objects were intersected and the number of hits that object has received, so that each objects contribution to the overall view shading can also be determined.
Direct Beam Shading Analysis:
Step 1: Adjust the Direct Beam Analysis settings as required:

- Dates for Analysis: Set custom dates for each month for the for the analysis if desired, or use the default dates. (The default dates for each month are the recommended average day for each month as outlined in Solar Engineering of Thermal Processes. (2013) 4th Edition.)
- Analysis Interval: Set the amount of time between each analysis interval in minutes, or use the default interval.
- Resolution: Select an appropriate level for the analysis, balancing performance with the level of detail required for accuracy. (Views with more complex objects in them, like trees, shading louvers, or balustrades will require a higher level of resolution to be detected accurately.)
Step 2: Start the Direct Beam Shading Analysis when ready and save the results. The results will be saved within the selected element’s ‘PHPP Direct Beam Shading’ parameters:
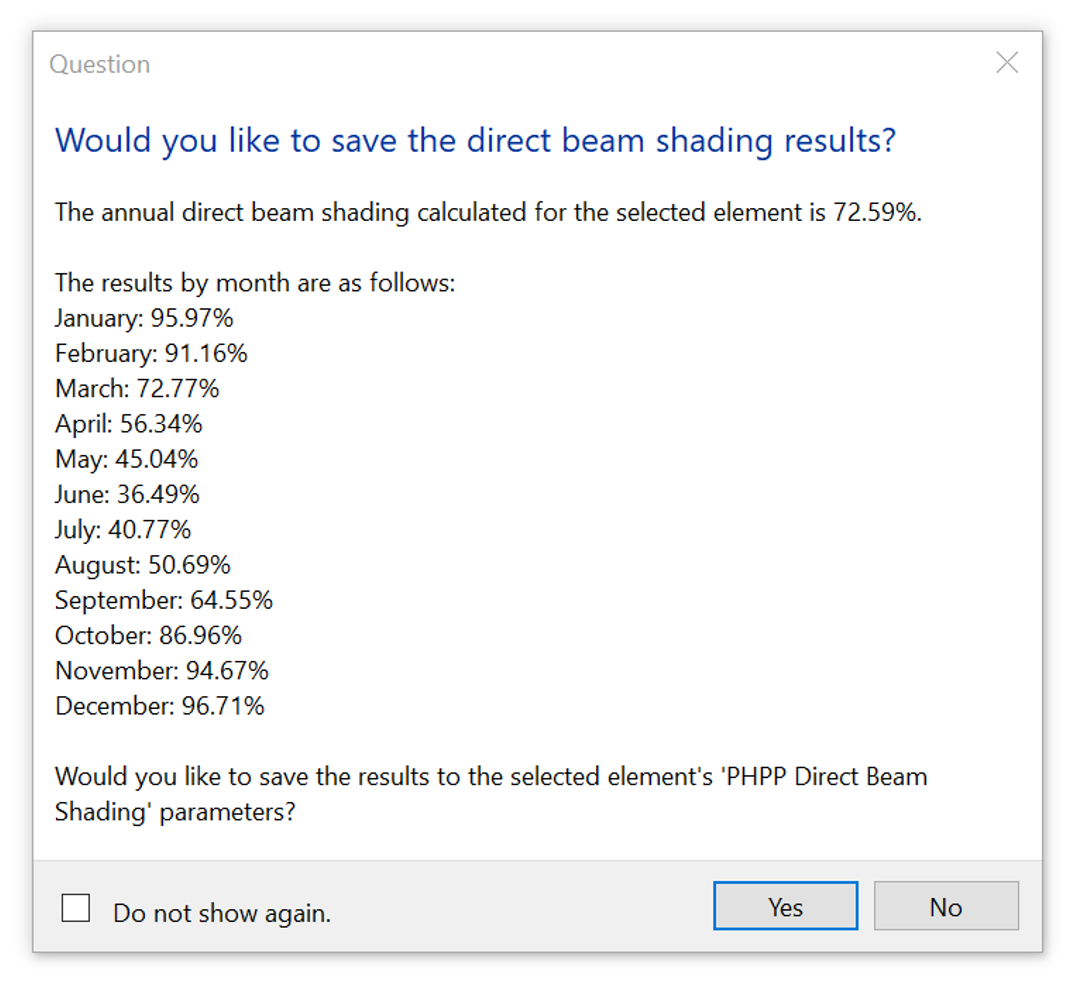
Step 3: Review the results and save the Direct Beam Shading Mask Image or Results Log if desired.
The Direct Beam Shading Mask represents the intensity of shading across the glass surfaces for all datetimes combined. Dark blue represents areas where shading occurs most of the time, while light yellow represents areas with little to no shading.

How it works:
Intersection rays are cast from a uniform grid of points on the glass surface/s outwards in the direction of the sun for each datetime. (The grid spacing and number of rays cast is determined by the chosen resolution.)
Any rays that intersect an object are recorded as a ‘hit’ and the number of hits and misses are recorded for each datetime to calculate the percentage of the total glass surface that is shaded for that datetime.
The shading results for each datetime are then aggregated to calculate the overall amount of shading on the glass surface/s for the month and for the year.
(Note: There is a small mismatch between Revit and NOAA sunset and sunrise calculations, with the latter being a more precise calculation that takes into consideration atmospheric refraction. The first analysis time used is taken 15 minutes after the NOAA calculated sunrise time.)
Reduction Factor Calculator:
Step 1: Adjust the Climate Data settings as required:

- Ground Reflectance: Set the Ground Reflectance or Albedo value of the ground. (Example: 0.2 bare ground, 0.7 snow. The default value is pulled from the PHPP file from the selected Climate Data Set. Hidden Cell E39)
- Monthly Horizontal Radiation: Set the monthly values for horizontal radiation. (The default values are pulled from the PHPP file from the selected Climate Data Set. Cells E31: P:31)
Step 2: Start the Reduction Factor Calculation when ready and save the results. The results will be saved within the selected element’s ‘PHPP Summer/Winter Shading’ parameters:

Step 3: Review the results and save the Reduction Factor Calculation Results Log if desired.
How it works:
Each datetime previously selected in the Direct Beam Shading Analysis is used to calculate solar position data based on the project’s location (using the site longitude & latitude) via calculations that replicate those released by the United States National Oceanic and Atmospheric Administration (NOAA.)
The solar position data (such as the True Solar Time, Sun Declination, Solar Zenith Angle, etc.) for each datetime, the orientation and tilt of the glass, the Ground Reflectance value, and the Monthly Horizontal Radiation values are then used as inputs for calculating the insolation on the glass surface/s.
The insolation is calculated for each datetime using the Anisotropic Perez model (Solar Engineering of Thermal Processes. (2013) 4th Edition. Equations 2.16.8 through to 2.16.14 with Table 2.16.1) which separates the Diffuse, Direct Beam, and Ground Reflectance components of the insolation.
The shaded diffuse insolation is derived from the unshaded diffuse insolation, weighted by the diffuse shading mask. The shaded direct beam insolation is derived from the unshaded direct beam insolation, weighted by the direct beam shading mask. The ground reflectance is calculated using the provided albedo value from the PHPP.
The total insolation in the shaded state is then divided by the total insolation in the unshaded state to determine a reduction factor for each datetime.
These reduction factors are then grouped by month, averaged for each month, and then divided into summer and winter seasons to calculate the final Winter and Summer reduction factors for the selected element.
Manually Calculating a Reduction Factor:
You can use the results of the Diffuse Shading Analysis to manually calculate a Reduction Factor for both winter and summer when there are complex shading elements such as trees in the view line. The steps for this are as follows:
Step 1: Use an elevation or section view to measure the height of the tree from the base of the glazing, and the distance of the tree from the glazing surface:

Step 2: Use the PHPP to calculate a Winter Shading Reduction Factor and a Summer Shading Reduction Factor for the tree only by temporarily entering in the distance and height values in the PHPP for a Horizon shading object in the row of the associated window:

(The initial temporary results shown for the Winter and Summer reduction factors of 64% and 76% in this example are calculated by the PHPP assuming the horizon shading object – the tree – extends across the entire skyline, without any transparency.)
Step 3: Calculate an ‘Additional Reduction Factor’ that correctly accounts for the tree obscuring only a portion of the skyline using the results from the Shading Analysis Tool and the following formula:
(rx) = 1-fx*(1-rx)
where x = winter or summer
So for this example, where the shading impact of the tree has been calculated at 4.5% of the skyline during analysis, the completed formulas for winter and summer would be as follows:
Reduction factor Winter (rw) = 1-0.045*(1-0.64)
Therefore rw = 0.984 or 98%
Reduction factor Summer (rs) = 1-0.045*(1-0.76)
Therefore rs = 0.989 or 99%
Step 4: Enter these values into the PHPP for the ‘Additional Shading Factors rw and rs.’ (Or you can enter the formulas directly into the cells, and excel will calculate the values for you.) Then delete the temporary distance and height values for the horizon shading object in the PHPP as they are no longer needed.

If you had more than 1 tree, you just repeat the same process and then multiply the reduction factors together like so:
(rx) = (1-fx*(1-rx)) * (1-fx*(1-rx)) * (1-fx*(1-rx))
PH Live Sync will accept the reduction factors entered into the PHPP or into the Revit parameter as either:
- A percentage: 98%
- A decimal: 0.984
- Or as a formula: = 1-0.045*(1-0.64)
Tips and Limitations
- Microsoft OneDrive users will need to have their PHPP file closed when syncing with PH Live Sync, as OneDrive blocks the file from being edited by PH Live Sync when it is open. Alternatively, save the PHPP file in a location outside of OneDrive.
- If a window, door or roof window/skylight family object is within a wall/roof that is part of the Thermal Envelope, and it has its ‘PHPP Sync’ parameter checked, PH Live Sync will automatically change the family object’s ‘PHPP Sync’ value to be checked also. (Otherwise the wall/roof area would not be calculated correctly.) A message dialog will be displayed to list the affected family objects. Conversely, if a wall/roof does not have its ‘PHPP Sync’ parameter checked but has one or more windows, doors or roof window/skylights hosted within it that do have their ‘PHPP Sync’ checked, PH Live Sync will automatically change the wall’s/roof’s ‘PHPP Sync’ value to be checked also. A message dialog will be displayed to list the affected wall/roof.
- If you are using your own family objects, please ensure that the ‘Width’ and ‘Height’ parameters of the Window, Door, or Roof Windows/Skylights you use match the actual width and height of the cut out (void form) to the host wall/roof opening or area calculations will be incorrect.
- If you are using your own family objects, having the ‘Width’ and ‘Height’ parameters set as ‘Instance’ types will allow you to edit their width and height within the PHPP, otherwise you can only updated them from the BIM.
- Walls are always assumed to be 90° inclination to the horizon. Floors are always assumed to be 180° inclination to the horizon. Ceilings are always assumed to be 0° inclination to the horizon. A Roof inclination to the horizon will be based on the roof’s pitch.
- Deleting objects (i.e. a wall or a window) should be done in Revit, as deleting objects from the PHPP by deleting the contents of an entire row in the PHPP will not work and will break the link between Revit and PHPP. (If you have done this mistakenly, you can simply click the ‘Push Data to PHPP’ button to sync the complete BIM data again.)
- If the number of elements in the BIM exceeds the default number of data entry rows in the PHPP, then PH Live Sync will advise you and you will need to add the additional rows required before you can continue syncing.